Review: GPU acceleration in Adobe Creative Suite 5
GPU computing is quickly starting to find its way into many parts of our lives. This is especially true in CG, where computing tasks are becoming increasingly complex. In the quest to reduce the time required to perform these tasks, software engineers often try to divide the workload between the CPU and today’s powerful GPUs: a movement of which Adobe in the vanguard.
In this review, we will be looking at one of the company’s latest releases: Creative Suite 5. This collection of design products comes in five separate editions, so rather than review each one, we will examine three of their core components: Photoshop, After Effects and Premiere Pro. Rather than look at all of the new features, we will focus on those that implement GPU acceleration, and assess how much practical difference this makes to artists’ workflows. Instead of being a review of CS5 itself, think of it as a review of how CS5 uses the GPU.
The technical background
First off, what exactly is GPU acceleration? Simply put, it is a process written into a software application that allows the program to offload some of the calculations required from the system’s CPUs to one or more GPUs within the system. I say “some” of the calculations because currently, only certain types of calculations – mainly those involving repetitive, parallel operations – are appropriate to the GPU: many still require the more traditional functions and data branching of the system’s main CPU.
Today, GPU computing is implemented through several developer APIs, such as Nvidia’s CUDA, Microsoft’s DirectCompute, and the open standards OpenCL and OpenGL. CS5’s components use a combination of OpenGL and CUDA for GPU acceleration.
For testing purposes, I will be using an HP Z800 workstation (reviewed here) with the following specs:
2 x Xeon 5680 6-core CPUs
18GB DDR3 memory
Custom HP dual-socket motherboard running 2 x 5520 Northbridge chips
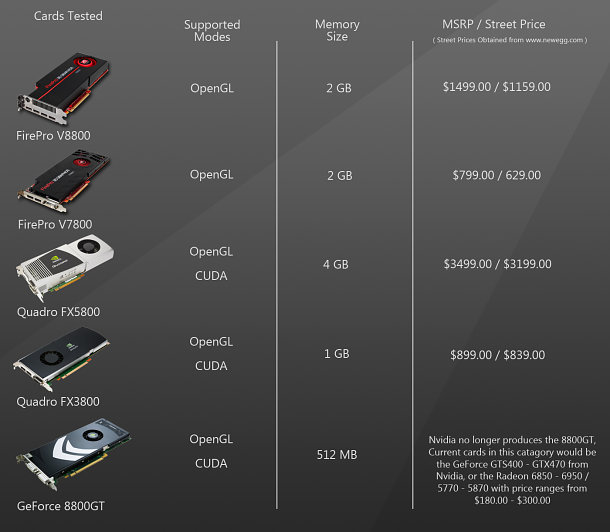
I will also be using five different GPUs: Nvidia’s Quadro FX 5800, FX 3800 and GeForce 8800GT, and AMD’s ATI FirePro V8800 and V7800. The cards range from gaming boards to high-end workstation models. You can view a comparison table above, and read my recent review of the ATI cards here.
Photoshop CS5
Photoshop CS5 is the newest version of the industry-standard image-editing application. It has a number of new features, including the option to create custom workspaces, content-aware filling, new bristle brushes and extra options for correcting lens distortion and removing noise from images imported in the RAW format. You can read a full list of features on Adobe’s website.
However, we’re only interested in the GPU-accelerated features here. Photoshop had a number of these already, introduced in CS4. These include image zoom enhancements (meaning that images appear smooth at all zoom levels, rather than only at factors divisible by two); flick panning; rotating the canvas; adjusting the pixel aspect ratio; the pixel grid; and color conversions.
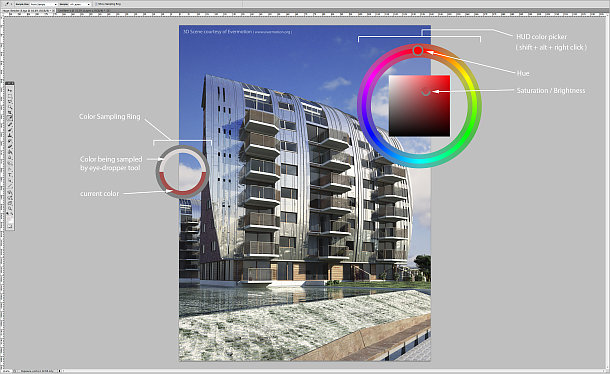
Photoshop CS5’s new GPU-accelerated features include the new HUD Color Picker and Color Sampling Ring
In CS5, these are joined by the following features:
1. Scrubby Zoom
The Scrubby Zoom feature is new to CS5 and it is a simple yet welcome refinement to the GPU-accelerated/optimized zooming tool. Before, with the zoom tool selected, if you clicked or [Alt]-clicked in the image, it would zoom in/out by a specified amount each time. Now if you click-drag in the image with the zoom tool, it will continuously zoom in or out until you release the mouse button, giving you very precise control over the zoom level of the image.
2. Heads Up Display Color Picker
The HUD Color Picker is a floating color wheel that pops up at the cursor position on [Shift]+[Alt]-right-click, allowing the user to quickly select a new foreground color, and disappears when the keys are released. This is a great new tool, especially for those who use Photoshop primarily for painting, as it allow you to quickly switch to new paint colors on the fly.
3. Color Sampling Ring
The CSR is a large ring around the eyedropper tool showing the current selected color in the lower half, and giving a real-time preview of the color the eyedropper is sampling in the upper half. It is another great tool that helps to streamline your workflow.
4. Brush Tip Previews
This enables you to preview and interactively change the brush size and hardness by holding down [Alt] and click-dragging the mouse.
5. Bristle Brush Preview
This is a small window that appears in the workspace showing a real-time rendering of the brush being used. While it is a quick way to determine brush orientation and pressure, it seems gimmicky to me, with no real production value. Those who do a lot of painting with Photoshop may disagree.
6. Rule of Thirds Crop Grid Overlay
This is a grid overlay used with the crop tool that follows the artistic Rule of Thirds. It is a simple addition, but I have found it very useful, especially when cropping down large DSLR images to refine the composition.
Testing procedure and results
Tests across the five graphics cards yielded some interesting results with Photoshop, in that performance across all of them seemed to be nearly identical. In part, this may be due to the testing procedure – I currently do not have a way to measure FPS in a 2D application (if you have any recommendations, please mention them in the comments) – so tests consisted of working with images of a range of sizes and layer counts and looking for perceptible differences in response time. So far as I could see, there were none.
The only exception was when using the GeForce 8800GT and working with the largest file. With a resolution of 10,125 x 13,500, editing operations on this 136.6 Megapixel image executed just a little slower – most notably zooming, panning and rotation. My educated guess is that this is due to the 8800GT’s limited onboard RAM (512MB, as opposed to the 1-4GB of RAM available in the workstation cards). If you want to experiment with the file for yourself, you can download it here.
Note that I deliberately didn’t test Photoshop’s 3D capabilities. (There are two versions of Photoshop CS5: the standard version, and an Extended edition, which offers the capability to import and paint directly onto 3D objects.) Having done some preliminary testing and spoken to colleagues who work in production studios, my conclusion is that Photoshop is not yet a realistic replacement for BodyPaint 3D or Mari in professional production, and that it would be a distraction to cover those toolsets in this article.
After Effects CS5
Adobe’s layer-based compositing package has also received a number of updates in CS5, including native 64-bit support; a new Roto Brush and Refine Matte tool; and an Auto-Keyframe mode. Again, you can read a full list of new features on Adobe’s website.
Unlike Photoshop, where GPU acceleration mainly affects the implementation of specific features, in After Effects it determines rendering speed. First, there is the OpenGL preview renderer, which is essentially the renderer for the composition viewport. With Fast Previews enabled (Fast Previews is the setting for the OpenGL preview renderer), the speed of the composition rendering in the viewport is noticeably quicker than with it disabled – although again, I don’t have any way to quantify this. If you have suggestions for tests that would measure preview frame rate, please post them in the comments.
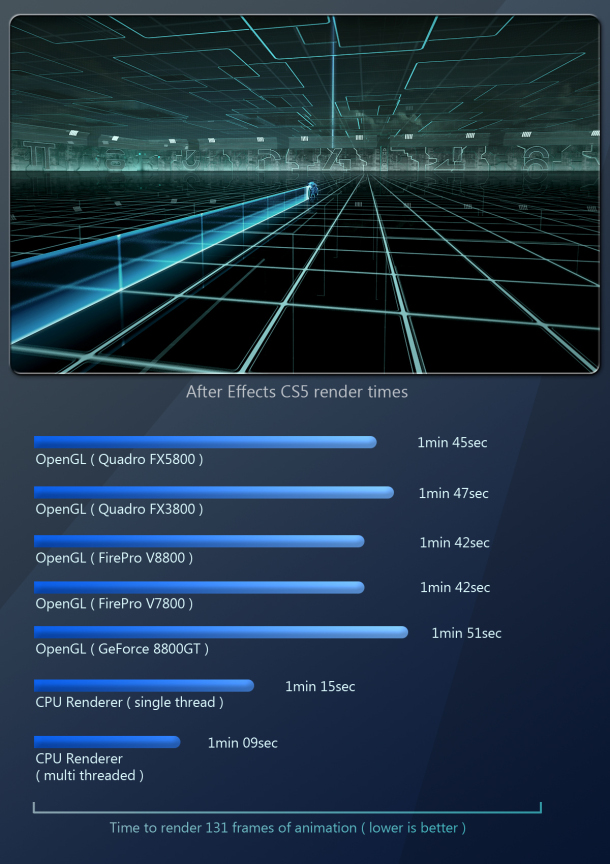
However, it is possible to quantify the impact of GPU acceleration on production rendering: in addition to the Fast Preview Renderer, After Effects CS5 also includes an OpenGL production renderer for final output. In my opinion, it still needs some work: in my tests, it was actually slower than the CPU renderer, and slower still than the CPU renderer with multithreading turned on. In addition, it doesn’t support all of the features in After Effects (you can find a list of the ones it does – and to be fair, it’s reasonably extensive – in the product documentation) so if a composition uses any features it does not support, it simply will not render them.
But while it may not be much use on real jobs, the OpenGL production renderer does offer some insight into the way the impact of GPU acceleration in After Effects CS5 varies between the cards on test.
As you can see, all the tested GPUs are very, very similar in performance, with the 2 ATI cards in the lead, followed closely by the 3 Nvidia cards. Personally, I would say that the difference is negligible – but in my opinion, the OpenGL renderer is not yet ready for final production-quality rendering anyway. You can download the component parts of the After Effects project file used in the tests here, here and here.
Premiere Pro CS5
Premiere Pro is Adobe’s solution for video production. Like Photoshop and After Effects, it is used quite extensively in the professional market, and gains a number of new features in the latest release, including expanded support for tapeless formats such as RED, XDCAM HD 50 and AVCCAM; native support for popular DSLR video formats; easier import/export workflow with Final Cut Pro and Avid Media Composer; and a streamlined Adobe Media Encoder.
But the biggest change to Premiere Pro CS5 is that, like Photoshop and After Effects CS5, it runs in native 64-bit mode, which means better performance with access to a much larger memory pool than in previous releases. This is a very good thing. With more and more video source footage moving from SD to HD, and film resolutions increasing to 4K and beyond, access to as much memory as possible is vital.
This 64-bit support is noticeable in the part of Premiere Pro CS5 that is GPU-accelerated – and the one aspect of CS5 that ditches OpenGL in favor of CUDA. Ladies and gentlemen, say hello to the Mercury Playback Engine.
There are two major features in Premiere Pro CS5 that support GPU acceleration, both of which are part of the Mercury engine. The first is the playback engine itself. Essentially, it uses the GPU to accelerate video playback calculations, allowing for users to scrub through and play back high-resolution uncompressed video smoothly.
The second is the GPU-accelerated effects and transitions within Premiere Pro CS5. Whenever any of them are used, calculations are moved from the system’s CPU and onto the GPU to permit rapid previews without the need to export final media. You can find a full list of the operations supported – which include such standard operations as Levels, Gaussian Blur, Sharpen, curves, color and gamma correction, garbage mattes, Track Matte Key, flips, dissolves and timecoding – in the product documentation.
Testing procedure and results
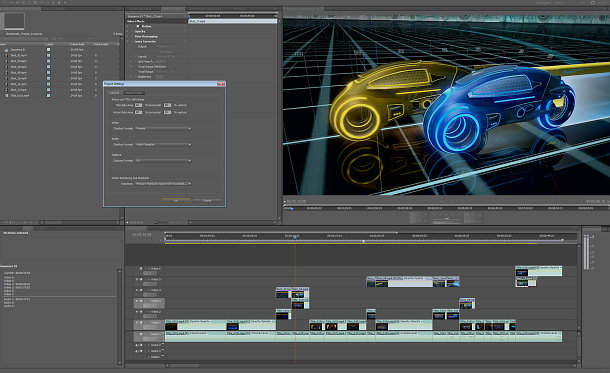
My test composition (unlike the previous test scenes, it is not available for download here since it contains copyrighted material) consisted of 24 clips of HD 720p video across 5 video layers and 17 audio clips on a single audio layer. The total length of the composition was 46.2 seconds, and each clip contained a Luma Corrector, Gamma Correction, and Time Remapping filter.
As I mentioned earlier, I currently do not have a way to record FPS in a 2D application. However, playback and scrubbing through the composition was substantially smoother and more fluid with the CUDA-enabled playback engine than the software-only playback engine.
Again, performance across all three Nvidia cards (since CUDA is a Nvidia API, the ATI cards do not offer any benefit here) was nearly identical. It would seem that any Nvidia GPU from the G80 family or newer possesses the computing power necessary to play back standard HD footage smoothly. (I have not yet experimented with 2K or 4K footage, and it may be that those may require the newer, more powerful GPUs.)
The real deciding factor in which CUDA-enabled graphics card to use with Premiere Pro CS5 is onboard RAM. While performance in my test was nearly identical across all three cards, the composition was only a little over 46 seconds: a fraction of that of professional video projects. If you are planning on working with hour-plus projects, or working with 2K or 4K footage, you are going to need a graphics card with more RAM. Any of the GeForce or Quadro cards with 1GB of RAM should work quite well; while for feature-length, high-resolution projects, the higher-end Quadro cards would be more appropriate. The Quadro 4000 offers 2GB of RAM; the Quadro 5000, 2.5GB; the Quadro FX 5800, 4GB; and the Quadro 6000 has a whopping 6GB of onboard RAM.
Overall conclusions
Creative Suite 5 has a range of GPU-accelerated features, some of which work quite well and have real production value. Others are gimmicky, and in my opinion, not terribly useful.
In the first camp, we have the new GPU-acclerated tools in Photoshop CS5, After Effects CS5’s OpenGL preview renderer, and Premiere Pro CS5’s Mercury Playback Engine. In the latter, we have After Effects’ OpenGL production renderer. Now don’t get me wrong: the poor performance of the production renderer should not be a deal-breaker when considering the upgrade to CS5 – the transition to 64-bit and the Roto Brush alone are reason enough in my book. We’ll just have to wait a bit longer for a fast, feature-complete GPU-accelerated production renderer within the software.
Workstation vs consumer cards
So which graphics card do you need to take advantage of CS5’s more practical GPU-accelerated features? While there are many professional DCC apps that can really take advantage of the tweaked drivers and higher memory pools of workstation cards, my tests suggest that the Adobe CS5 applications run equally happily on less expensive consumer cards. The only exception is Premiere Pro; and even then, only if you are working with large projects.
With Photoshop, I feel that it is safe to say that any recent Nvidia or ATI card with at least 1GB of RAM is more than enough computing horsepower for all of the GPU-accelerated features, even with the very largest images.
With After Effects, if you are using the OpenGL preview renderer, any recent Nvidia or ATI card with 1-2GB of RAM should suffice, unless you are working with long compositions at resolutions of 2K or higher.
With Premiere Pro, it gets a little different. First of all, you need a CUDA-enabled card – which, as I mentioned earlier, means Nvidia cards only. Second, while consumer cards seem to run the Mercury Playback Engine just fine with standard and HD footage, if you are working with feature-length projects at 2K resolution or higher, you may want to consider one of the higher-memory professional cards. That said, I would estimage that 80% of Adobe CS5 users would get by just fine with a mid-range consumer card.
Where next?
For future releases, it would be nice to see GPU acceleration integrated more into the core of Adobe applications instead of just a handful of specific modules: something that may require a move away from OpenGL to APIs such as CUDA, OpenCL or DirectCompute.
But despite the fact that not all of the GPU-enabled features in CS5 are 100% production-ready, Adobe is definitely headed in the right direction. I believe that once GPU computing starts to mature, we will start seeing more hybrid CPU/GPU solutions which can take advantage of all the available processors in a system, routing calculations dynamically to the ones to which they are most appropriate.
CS5 is already an impressive suite of applications, and one that offers a vast array of new features that would greatly improve any production environment. Further support for GPU computing can only improve it further.
View full specifications for CS5 software on the Adobe website
Special thanks to
Adobe
Nvidia
ATI/AMD
HP
Elizabeth Poeschl of Edelman
Shannon Deoul of RAZ Public Relations
Sean Kilbride of Nvidia

